Saturday, June 8, 2019

Lacto fermentation galore


Last 6 months have been a crazy whirlwind in my life. I got juried into me first ever and a very prestigious art show- the Phippen Museum Western Art Show in Prescott, AZ at the beginning of this year and as a result the next 5 months were spent getting ready for the show and making more and more art locked up in my studio. Getting all the other necessities like business cards, tent, text banners, making prints, and did I mention... mostly making paintings...I was also taking part in the QuickDraw event at the show where all artists have to, each, finish a painting in an hour which will then be auctioned off in front of thousands of spectators. Yikes, no pressure there at all... I had anxious nights and crazy dreams of not being able to finish my painting in time!!!


It all got done. I did my art show, sold some paintings, did the QuickDraw (painted my husband from life)!


BUT...

I didn't take care much of my health, exercise and food in the months before. As a result of not getting any sun (serious lack of Vitamin D) and the above I lost a lot of weight (which I didn't have much to lost to begin with), my teeth started hurting, getting cavities and soon as the show was over I actually had to get a wisdom tooth pulled out.
But that was not all after getting it yanked... I got a fever and pain. It has been 5 days now going through that and the fever has finally gone but the pain and lack of energy still remains.
So, the most important thing I need to do for myself now is great lots of sun, way lots of good food and pickles...
So I have gone lacto-fermentation-wild.
Here I have sauerkraut, carrots, beets, cauliflower, dikon, cucumbers, asparagus, phew. All in a day's feverish frenzy!!!


Pretty much the same procedure and recipe as my asparagus pickles with variations of spices and flavorings.

For example, Here is the making of the dikon pickles... 
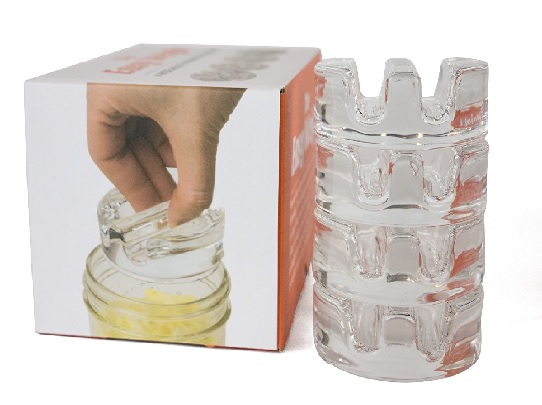
Dikon slivers, slit fresh chilis, 1 tsp turmeric powder, 1 Tsp ground mustard seeds 1 Tsp coriander seeds and a couple Tablesppons or so or a previous pickled vegetable packed in a half gallon mason jar and then filled with brine. Used the same glass weights and lids from the asparagus pickle recipe.
ALTHOUGH I FOUND THESE LIDS THAT I LIKE BETTER... they have an easy grip  that lets me open the lids easier and the vent sits higher then the last ones so that the liquids have less of a chance of oozing out when I suction the oxygen out of the jars with the provided pump.


Here is the cucumber pickles in the making... Try to find fresh dill. oh so good but you can get by without it :)


Asparagus


Here again in the lineup are....
CUCUMBER


DIKON

ASPARAGUS


CAULIFLOWER

SAUERKRAUT with cabbage, beet tops, ginger and kelp

CARROTS AND BEETS


Here's to good health, pickles and sunshine...


Sunday, June 17, 2018

No non-sense Lacto-fermented Asparagus Pickles


In the last few months I have made and consumed, certainly, a few gallons of Asparagus Pickles. Asparagus is a pre-biotic food to begin with, meaning that it feeds the good bacteria in your guts and so making pickles with it seems to be doubly beneficial. I certainly notice a difference when I eat asparagus pickles compared to any other pickles.
Since I am on an pickle kick, it's a good time to add the recipe to the long forgotten blog!


I add the juice of an old batch of pickles to the next pickle to ensure the establishment of the good bacteria and hopefully preventing your pickle jar from getting attacked my molds. if you do not have juice from your previous pickle/sauerkraut, then you use the whey from yogurt. Strain your yogurt and use the whey (the water that runs out) instead of the old pickle juice. In the absence of either, just use more salt, as indicated in the recipe, to prevent bad bacteria and molds from growing.

I have  noticed that 2 average bundles of asparagus, as found in the US markets sufficiently fills my 1/2  gallon mason jars. these have a wide mouth and for these jars I use these glass weight to put on top of the vegetables so they  don't come floating to the top of the brine. you want your vegetables to be submerged in the brine so that they don't attract mold s and are happily underwater in the sea of brine.


Amazon.com link for the Fermentation Weights


I close the lid with these special fermentation lids that only allow the air from inside (the CO2 produced during fermentation) to escape out but do not let the fresh oxygen to reach inside which may lead to molds growing. Though I have also made the pickles with a cloth cover tied around the mouth of the jar. Go figure and experiment!


Amazon.com link for the Fermentation Lids

No non-sense Lacto-Fermented Aaparagus Pickles

2 bundles of fresh Asparagus

Brine (2 Tbsp. salt dissolved in 1 quart / 1litre of water. 3 Tbsp. salt if not using old pickle juice/whey)

pickling spiced of your choice (fresh garlic, jalapeƱos, coriander seeds, whole black pepper, bay leaves, fresh dill) whatever is accessible and available, or none if you want them just plain

one half gallon mason jar washed in hot soapy water (or any other odd jar you might have.

a weight that would keep your vegetables submerged

a lid or just a cloth to tie around the mouth of the jar

around 1 cup old pickle juice or whey

You can scale your recipe depending on how much you want to make, of course.


Add, if using, your choice of picking spices at the bottom of your jar.


Trim off the bottom hard woody parts of your asparagus shoots, and pack them as tightly as you can in your jar. making sure to leave a couple inches of space above in the jar. break of the tall asparagus stems if you need to and stuff these on the sides to ensure enough space on top.


Now add about a cup of your old left over pickle juice, if you have it, or whey to the jar. If not make your brine with a higher percentage of salt as described above.
Put your fermentation weight above the asparagus and just fill your jar with brine. Make sure that the brine goes above your weight and all the vegetables are submerged and below the brine. You may have to mix some more brine if you don't have enough.


Put the lid on the jar and leave them on your kitchen to ferment for 3 days or so, depending on the weather. Taste and see if they have started to sour in 3 days. Put them in the fried if done. They will continue to sour outside the fridge as long as you want.


When the pickles are done the brine will be milkier and they will smell sour-ish. if they smell rotten then certainly something went wrong, but if your vegetables are under the brine the whole time and the brine is salty enough it should all go well. Sometimes it takes time to get used to the characteristic smell of the lacto-fermented pickles. You may see while specks of mold floating on top. Usually you can just fish them out and it will be all ok.

These lacto-fermented pickles (called so because of the lactic acid bacteria, like lactobacillus) are packed with  "good-guys" good for, ah, so much.  Good for detoxing, digestion, repairing your guts, absorbing and assimilating food. The list goes on and on.... There is a huge imbalance of good and bad bacteria in our guts today and so all the more important to add fermented foods to your diet. And what a fummy way to do it! Enjoy!


Friday, September 20, 2013

Vietnamese Curry

We have all hear of the amazing Thai Curries in all so many "colors' Red, Green, Yellow... But the not so well known Vietnamese curry is every bit flavorful and amazing and much easier to make from scratch compared to making the Thai Curry pastes.

Ingredients:

2-3 Tsp olive oil (you may want ot use coconut oil)
3 cloves garlic chopped
1 medium red onion (or 2 shallots) chopped
1 to 1.5 Tsp (homemade) curry powder (I will post a recipe soon.)

1tsp (or to taste) your favorite chili paste
1 tsp salt
1 tsp raw sugar
2can coconut milk
1 cup water
1 stalk lemongrass cut in half lengthwise and lightly bruised
1" piece of ginger cut in half lenghtwise and lightly bruised

carrots
mushrooms
sweet potato
cauliflower1/2 yellow onion cut into wedges
1 box of sproutofu

garnish with cilantro and green onions

Method:
In a large pot heat the oil and add chopped garlic and onions and the curry powder and stir until fragrant, about a minute.
Now add the chili paste, salt, sugar, coconut milk, water, lemongrass and ginger. Let the curry come to a boil.
Now add the rest of the vegetables, any or all of the above( or whatever you can fing in your refridgerator.

Now cover the pot, bring it to a boil, turn the heat down and let it simmer until the sweet potatoes are cooked.

Garnish with cilantro, green onions.
Serve with hot brown rice.

P.S.: It was so good that I forgot to take a picture...

Thursday, December 30, 2010

Tom-Yum (Thai Hot & Sour Soup)

I have to say, that a good "Tom-Yum" has to be just the best soup in world!

Especially when you are under the weather in any way of saying...
This is the view outside my window as I am typing this.


This is my version which I have been playing with and perfecting for quite some time, but have been too lazy to post ;)
It's very simple to prepare... if you have ginger garlic onions and a few veggies in your fridge, you have everything you need!


Ingredients:
2-3 Quarts Good vegetable stock (you can just use water if you don't have stock on hand)
14 cloves or more garlic minced (For me it's not possible to have too much ginger & garlic in this soup)
2- 2 1/2 inch piece of fresh ginger minced
1 medium onion or more sliced
5-6 big mushrooms sliced
3-4 slicks of celery sliced
4-5 dried shiitake mushrooms broken up into smaller pieces (optional)
a few slices or fresh or dried galangal- Thai Ginger (absolutely optional)
Sambal Oelek Chili paste/fresh green chilies/dried red chili pods/cayenne powder
salt
Lemon juice
2-3 carrots Sliced
Broccoli
Any other vegetables that you have on hand
Cilantro as a garnish (optional)

Method:

In a large pot bring the stock to a boil and add ginger, garlic, onions, mushrooms, celery, chili paste, salt. Let this come to a boil again and cover it and simmer for at least half an hour.


Taste for salt and chili. Add juice of one lemon (more or less) according to your taste).

Have all your veggies prepared like carrots, broccoli, etc.


Bring the soup to a boil, Add all the veggies, take the heat off the pot right away and put the lid on for at least 5 minutes.
These veggies will get slightly cooked int he hot broth and still remain slightly crunchy.

Enjoy it hot and steamy after the veggies have steeped in the hot soup for 5 minutes.

Sunday, May 30, 2010

Cooking with Kids...

Esther, my dear sister-in-law gave this really great cookbook Honest Pretzels to the kids for Christmas this last year. It is really really good! With very neat illustrated kids recipes. We finally decided to "use" it for real!

Himanshu washed and cut a bunch of salad...
And Kiki made stickey buns!!! ::D Yummy!


What a fun day!!!!! :D


Saturday, May 29, 2010

Green Soup with Ginger


A very nice soup for cool days! I loved it so much that I have made it twice already this week, given the cold rainy days that we are having!


1 large onion chopped
1-2 Tbsp olive oil
10cups approx good vegetable stock
3tbs of grated ginger or more to taste
1 large leek
3-4 carrots (or sweet potatoes)
4-5 stalk of collard
3-4 stalks of red chard
1/2 a bunch of spinach
salt and pepper to taste
lemon juice to taste.

You can use any combination of greens in this soup.


In a shallow pan add the onions and olive oil with a light sprinkle of salt and cook on low heat for about 1/2 an hour or until the onion are light brown, stirring occasionally. Don't let them burn.


In a large pot add the broth, leeks, collards, chard and bring it to a boil. Add salt and pepper.
Cover the pot with a lid and simmer for 15-20 minutes, until all the vegetables are done.

When the onions are done, add them to the pot with the soup. Add lemon juice according to your taste and adjust the salt.

Throw some fresh spinach in each bowl of soup right before serving and serve piping hot with warm crusty whole grain - preferably sourdough- bread!

This recipe is adapted from Love Soup by Anna Thomas.
Serves 5-6.

Friday, August 14, 2009

Mustard

Homemade mustard is so good and sooooo easy that once you make it, you'll never want to buy it again. The best part is that you can make endless variations and flavours of mustard.

There are two kinds of mustard seeds that can be found at a health food store/online. I bought mine at mountainroseherbs.com.
These are:
The Yellow seeds (milder)
brown or black seeds (spicier than the yellow ones)

The "Chemistry" behind:
Mustard seeds aren't hot, and neither is mustard powder. But when the crushed seeds or powder is mixed with cold water, a chemical reaction occurs as the seeds' cells release enzymes and other compounds that create the pungency. Within ten to fifteen minutes it will reach its peak pungency, from where it will start to decline. At this point an acidic ingredient, such as grape juice, lemon or lime juice, vinegar, beer, cider or wine is added to stabilise the pungency and stop it in its tracks. If you were to add a hot liquid to the paste, the enzymes creating the hot taste will be destroyed. Once the essential oils have formed, other ingredients can be added to enhance the taste, such as salt, honey, sugar, pepper corns, tarragon, turmeric (for colour), garlic, pepper, dill, paprika, chillies, thyme, etc.

A basic rule in mustard making is to avoid contact between the mustard paste and aluminium. Vinegar, wine or other acidic materials can leach metal molecules from aluminium pans, so use only plastic, glass, enamelled or stainless steel utensils for making your mustards. For storage and ageing of mustards, use only sterilised glass jars with tight fitting plastic or enamelled-lined lids.

Spicy Mustard

2 Tbsp yellow mustard seeds
1 tsp brown mustard seeds
1 1/2 Tbsp water
Grind the mustard seeds into a powder with a spice grinder.
Mix hte above 3 ingredients into a thick paste and let it sit for about 10 minutes.
Now to this add the following spices:

1/4 tsp salt
1/4 tsp turmeric
1/4 tsp ginger
1/4 tsp allspice
2 Tsp apple cider vinegar (or any of your favorite vinegar: white vinegar, white wine vinegar, red wine vinegar, balsamic vinegar)

Add some more vinegar if you want a thinner mustard.
Fill this up in a glass jar and let sit out of the fridge for at least a week before eating.

Sweet mustard
2 Tbsp yellow mustard seeds
1 1/2 Tbsp water
Grind the mustard seeds into a powder with a spice grinder.
Mix the above 2 ingredients into a thick paste and let it sit for about 10 minutes.

Add about
1/4 tsp salt
1Tbsp or more honey
Enough apple cider vinegar to make the desired consistence vinegar.
Add some more vinegar if you want a thinner mustard.
Fill this up in a glass jar and let sit out of the fridge for at least a week before eating.


Play around with various herbs and spices, fruit juice concentrates etc. and be creative.
And have fun!
Enjoy!